My New Frigidor Build

Joined Jun 2005
2K Posts | 0+
McHenry, IL
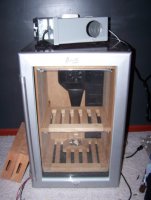
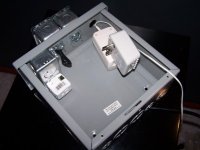
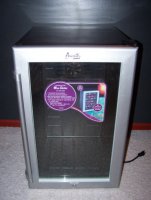
I finally started working on my new Frigidor yesterday. I could just put some proper shelves in there and a humidification device and be done with it but simplicity is not in my nature. So I'll be lining it in solid spanish cedar, installing fans, cold cathode lights, new solid spanish cedar shelves, and wiring everything to one control center junction box.

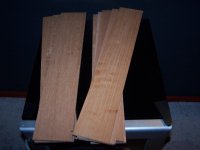
So yesterday I got to work cutting the wood for the lining and shelves. Not wanting to waste wood and space I resawed the lining to 5/16" from 13/16 solid spanish cedar. I soon realized I should have worn a respirator, as the cedar is irritating and just plain tastes horrible. I had that taste in my mouth for the rest of the night.

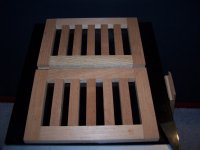
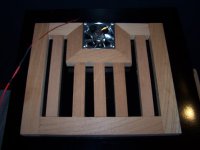
Once done I put some slatted shelves together (2 upper and 1 bottom). They have to be scribed in place still as the interior of the Avanti is molded into a trapezoidal shape with the front of the unit wider than the back. The bottom shelf has a notch built in to receive one of the fans. I'll have one on the bottom and one on the top. I'm still not sure whether I'm going to have the same shelf in the top, or just mount the fan.

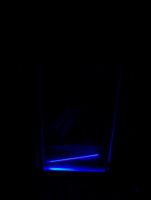
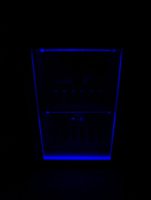
I also spliced some extra wire onto the cold cathode lights to get the wires out of the inside. The 12" lenght they come with wouldn't get me far.

Hopefully I'll have more to show tomorrow.

You can see more pics @:
http://s64.photobucket.com/albums/h181/iminaquagmire/
 

Attachments

  • Door Closed (400 x 533).jpg
    Door Closed (400 x 533).jpg
    32.8 KB · Views: 2,389
  • Lining (400 x 300).jpg
    Lining (400 x 300).jpg
    12.8 KB · Views: 2,634
  • Top Shelves (400 x 300).jpg
    Top Shelves (400 x 300).jpg
    14.9 KB · Views: 2,634
  • Bottom Shelf With Fan (400 x 300).jpg
    Bottom Shelf With Fan (400 x 300).jpg
    14.7 KB · Views: 2,632
I hadn't tried the lights inside yet so I decided to test it, but when I powered them up, only half of each tube would light. I must have tried every combination of power supply to light connection to no avail. Then thinking that the power was being reduced in the length of the hookup wire, I got rid of the splice and they worked correctly. Needing the length though, I tried a different, larger guage wire, and that was even worse though it did carry the 680 volts well to my carpet :shock: (just a slight smell thankfully) :lol:. Just have to make keep the runs as short as possible I guess...

I know I'm rambling about stuff nobody probably cares about, but I'm just so exicited to finally be working on this! :lol:

Anyways, here's a pic of the test I did. This is only one of the six lights I'm going to use, so it should be rather bright. :lol:
 

Attachments

  • Light Test (400 x 533).jpg
    Light Test (400 x 533).jpg
    4.6 KB · Views: 2,382
Looking good!

What about some bling bling on the outside? :D
 
Capt said:
Looks great! How many boxes is it goning to hold?

No clue. Its a lot smaller than I had thought it was. I'm guessing 12 or so though I'm going to have at least three trays of singles so probably more around 7 ot 8.
 
I have four sheves in and I think I have 6 boxes in the bottom. I could fit a couple more but it would be really cramped in there.
 
Man, That is a fine piece of machinery ya' got thar' mister. :thumbsup: :wine: :eek:mg:

. . .someday I hope to be the proud owner of a "Frigidor"

I'll take it. . .how much? :hypercolor: :hypercolor: :hypercolor:

great work
 
Barcochris said:
I have four sheves in and I think I have 6 boxes in the bottom. I could fit a couple more but it would be really cramped in there.

After measuring a couple boxes I think you're right.


I'll take it. . .how much?

I haven't added it all up yet. Right now I don't even want to know. :D
 
I bought the cooler on E-bay for 150 Shipped. (scratch and dent)

another 100 in spanish cedar.

110 in a cigar oassis (took this out and used two pounds of kitty litter 12 bucks)

about 80 bucks in fans and power suplies.


60 in a Johnson temp controller. (may not be needed)


For me in Az it was the only choice, When I got hoe and the temp was in the 80 I started to order parts the next day.

By the way Quag,,, Awesome work, yours is much nicer than mine. I did not line the sides. it looks fantastic
 
How do these things regulate the air temp? I thought refridgeration devices removed the moisture from the air?
 
bkelm18 said:
How do these things regulate the air temp? I thought refridgeration devices removed the moisture from the air?

That unit doesn't work that way, it's thermoelectric, not compressor driven. So the humidity stay constant within a couple of points either way. I love mine, it stays around 65° F and about 65% RH. And, I just got another one for long-term storage.
 
Well, I wanted to post some more but unfortunately all I've gotten done are some tedious cuts and a little lining assembly. So not much to show except half assembled parts...

While building another shelf I did manage to put a nail through my thumb though. Right next to the fingernail through the other side. It didn't hurt at all then but right now I'll just suffice to say I don't want to do much with it.

Hopefully I'll get a little more done tomorrow.
 
this is an awesome thread, good luck with the progress I cant wait to see it.
 
What type and how much humidification are you going to put in it. I have the same type of wine cooler and i have one pound of beads and i was thinking about putting a little more in it. What do you think?
 
Bobberrific said:
Quag, are those cold cathodes?

Yes. 12" UV tubes. I found out that the inverters on them are specifically sized to power only about 12" so the reason they weren't lighting up was that I had surpassed the inverters range by about 5 feet.

What type and how much humidification are you going to put in it. I have the same type of wine cooler and i have one pound of beads and i was thinking about putting a little more in it. What do you think?
I am going to use my Oasis and put a pound or so of dry beads to dry up and overhumidification. If that doesn't work I'll just use beads. More beads can't hurt but 1 lb should be more than enough.
 
Still not done but I can see the light, REALLY I CAN! :lol:

I got most of the pieces assembled. Some very time consuming cuts were involved, made even more so when you have to take everything apart because you forgot to also notch around say, the thermostat... I still have to remake a piece for the back so the lining isn't completely done.

I also got the lights installed. They were actually much easier to install than I had originally thought they'd be, though I still have to attach them to the power supply in the control box. I'm going to have a control box that will turn the lights on and off and also house all of the wires and timer for the fan. Everything will be plugged into that so there will only be one cord. I'm going to try to get that all done tomorrow.
 

Attachments

  • Lights Off (400 x 533).jpg
    Lights Off (400 x 533).jpg
    32.5 KB · Views: 1,340
  • Lights On (400 x 533).jpg
    Lights On (400 x 533).jpg
    5.4 KB · Views: 1,340
  • Bottom Light Wiring (400 x 300).jpg
    Bottom Light Wiring (400 x 300).jpg
    16.4 KB · Views: 1,403
  • Control Box Innards 1 (400 x 300).jpg
    Control Box Innards 1 (400 x 300).jpg
    17 KB · Views: 1,403